Ubuntu18.04上使用Nginx部署.NET Core 2.1 Web项目过程全记录
Copyright Notice: This article is an original work licensed under the CC 4.0 BY-NC-ND license.
If you wish to repost this article, please include the original source link and this copyright notice.
Source link: https://v2know.com/article/471
部署Ubuntu 18.04基本配置
新装Linux系统注意事项(以Ubuntu 18.04为例)
安装MySQL
产生.NET Core 2.1 Website for Linux-x64
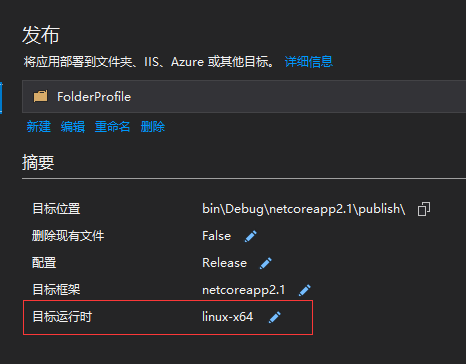
如下图所示在产生发布文件的时候,一定不要忘记勾选linux-x64平台:

使用WinSCP在/var目录下新建一个www目录,将发布好的文件夹放在www目录下。
安装.NET Core运行时:
wget -q https://packages.microsoft.com/config/ubuntu/16.04/packages-microsoft-prod.deb -O packages-microsoft-prod.deb
sudo dpkg -i packages-microsoft-prod.deb
sudo apt-get install apt-transport-https
sudo apt-get update
#目前运行时最新版是2.2
sudo apt-get install aspnetcore-runtime-2.2
#查看运行时版本
dotnet --version
cd到你的项目目录,测试运行:
#xxx是你项目(解决方案)名称
dotnet xxx.dll
如果运行成功,则创建服务
#服务名称自定义,不一定叫kestrel-mywebsite.service
vi /etc/systemd/system/kestrel-mywebsite.service
输入一下内容:
[Unit]
Description=MyWebSite a .NET Core Web App running on Ubuntu
[Service]
WorkingDirectory=/var/www/{你的项目文件夹}
ExecStart=/usr/bin/dotnet /var/www/{你的项目文件夹}/{你的项目dll}
Restart=always
RestartSec=10
SyslogIdentifier=dotnet-mywebsite
User=root
Environment=ASPNETCORE_ENVIRONMENT=Production
Environment=DOTNET_PRINT_TELEMETRY_MESSAGE=false
[Install]
WantedBy=multi-user.target
注意:
WorkingDirectory和ExecStart替换成自己的上传目录和dll。
接下来:
#开机启动.NET服务
sudo systemctl enable kestrel-mywebsite.service
#启动.NET服务
sudo systemctl start kestrel-mywebsite.service
#检查服务是否正常运行
sudo systemctl status kestrel-mywebsite.service
#检查网站是否正常访问,正常将会返回200
curl -I localhost:5000
该步骤为补充:
#假如你想要更新重新上传dll,则需重启服务
systemctl restart kestrel-mywebsite.service
安装Nginx
1. 简单方法
sudo apt-get install nginx
#启动Nginx
sudo service nginx start
#查看Nginx版本
nginx -v
2. 复杂方法 (不适合小白,这里是指“缺少啥就去安装啥”你可能不会装,建议别动)
# gcc g++
apt-get install build-essential
apt-get install libtool
# pcre
sudo apt-get install libpcre3 libpcre3-dev
# zlib
apt-get install zlib1g-dev
# ssl
apt-get install openssl
apt-get install libssl-dev
# 下载
$ wget https://nginx.org/download/nginx-1.17.8.tar.gz
# 解压
$ tar -zxvf nginx-1.17.8.tar.gz
# 进入目录
$ cd nginx-1.17.8
# 配置,这里可能会报错,缺少啥就去安装啥
$ ./configure --prefix=/usr/local/nginx
--with-http_gzip_static_module
--with-http_v2_module
--with-pcre
--with-http_ssl_module
# 编译,这里可能会报错,缺少啥就去安装啥
$ make
# 安装
$ make install
# 通过软连接,这样就可以直接使用 nginx 执行
$ sudo ln -s /usr/local/nginx/sbin/nginx /usr/bin/nginx
注意安装完成后,建议检查一下Nginx的安装位置:
whereis nginx

检查一下版本:
nginx -v
然后,配置文件是在:

键入指令:
# 注意,/etc/一定是存在nginx的,如果你找不到,那很有可能你没装好Nginx
vi /etc/nginx/sites-enabled/default
修改里面的server配置文件为:
server{
    listen 80;
    server_name example.com *.example.com;

    location / {
        proxy_pass http://localhost:5000;
        proxy_http_version 1.1;
        proxy_set_header Upgrade $http_upgrade;
        proxy_set_header Connection keep-alive;
        proxy_set_header Host $host;
        proxy_cache_bypass $http_upgrade;
        proxy_set_header X-Forwarded-For $proxy_add_x_forwarded_for;
        proxy_set_header X-Forwarded-Proto $scheme;
    }

}
接下来:
#检查配置文件错误
nginx -t
#重启nginx
nginx -s reload
注意:
example.com *.example.com是你解析网址;
以上这一串配置的目的是为了把你5000端口的请求转接到80响应上,因为不配置这个东西,你在本机是可以http://localhost:5000的方式访问,但只限于本地。
配置完成后,可以通过url解析了,这里默认的还是http。
问题说明:
nginx -s reload可能会失效,你可能会遇到:
nginx [error] invalid PID number in usrlocalnginxlogsnginx.pid
因为是加载配置文件报的错,所以用-c 选项指定配置文件 ,指明后问题解决,
nginx -c 【你的conf文件位置】
nginx -s reload
补充一下,如果你是通过第二种方式安装Nginx遇到的这个问题,那我建议你重新安装Nginx。(因为正确安装之后不可能出现这个问题)
接下来重新配置Nginx
键入指令:
# 注意,/etc/一定是存在nginx的,如果你找不到,那很有可能你没装好Nginx
vi /etc/nginx/sites-enabled/default
一般配置(样本):
server {
  listen 80;
  server_name example.com www.example.com;

  location / {
    root /var/www/main;
    index index.html;
  }
}
.NET Core 2.1 的配置(实例):
server {
  listen 80;
  server_name example.com *.example.com;

  location / {
    proxy_pass http://localhost:5000;
    proxy_http_version 1.1;
    proxy_set_header Upgrade $http_upgrade;
    proxy_set_header Connection keep-alive;
    proxy_set_header Host $host;
    proxy_cache_bypass $http_upgrade;
    proxy_set_header X-Forwarded-For $proxy_add_x_forwarded_for;
    proxy_set_header X-Forwarded-Proto $scheme;
  }
}
由此可知,.Net Core 2.1默认5000端口,我们不是从Nginx访问和加载网页的,我们是以访问http://localhost:5000的方式进行了代理。
这和在IIS下面无托管是一个道理,.NET Core的内部其实已经又实现了一个类似于IIS的东西,所以在Nginx这里的配置也不是很传统。
但是我们不需要管,我们只要配置好80端口,并正确解析就完事了,然后我们使用certbot-auto来解决Https的问题。
给Nginx安装免费的SSL证书
好,这个时候应该能通过域名访问你的网站了。(前提你解析了)
你一般在网上搜到2种教程,一种是叫你装certbot的,一种是叫你装certbot-auto。
区别的话,certbot-auto是certbot简化版,是python脚本,可以帮你摆脱所有复杂的操作。
我们这里使用certbot-auto。
一共只需要3条命令:
sudo wget https://dl.eff.org/certbot-auto -O /usr/sbin/certbot-auto
sudo chmod a+x /usr/sbin/certbot-auto
#example.com www.example.com 改成你已经解析的域名
sudo certbot-auto --nginx -d example.com  -d www.example.com
最后,在服务器 crontab 上配置以下命令,以便在需要时自动续订 SSL 证书
0 2 * * * sudo /usr/sbin/certbot-auto -q renew
操作方式:
sudo crontab -e
这将会打开一个文件,默认如果你没设置过的话,应该是一堆注释。
删除这些注释,并写入上面提供的配置命令,保存,
接着,使用命令:
crontab -l
查看已经配置的计划,如显示:
0 2 * * * sudo /usr/sbin/certbot-auto -q renew
则说明配置完成。
crontab是一个命令,常见于Unix和类Unix的操作系统之中,用于设置周期性被执行的指令,格式:
minute hour day month week command
例如:
0 3 1 * *
表示每月1日凌晨3点整将会执行添加的命令,注意用sudo crontab -l查看是否添加成功。
至此位置,你应当已经完成了该教程的所有配置。
接下来的内容是额外补充的Https的一般配置方法,如果你做好了使用第二种方式安装Nginx并失败的觉悟的话,可以自行尝试。
以下提供手动配置Https、Http2、ipv6、增强型加密的Nginx.conf的示例。
Nginx配置Https(一般配置法)
server {
  listen 80;
  listen 443 ssl;
  server_name example.com www.example.com;
  ssl_certificate ssl/fullchain.cer;
  ssl_certificate_key ssl/example.com.key;

  location / {
    root /var/www/main;
    index index.html;
  }
}
这样的配置其实安全性还不足,同时未启用HTTP2。
大致可以知道生成的key在
ssl_certificate /etc/letsencrypt/live/abc.com/fullchain.pem;
ssl_certificate_key /etc/letsencrypt/live/abc.com/privkey.pem;
一般这样就算完事了。
https 默认采用 SHA-1 算法,非常脆弱。
我们可以使用迪菲-赫尔曼密钥交换。
我们在 /conf/ssl 目录下生成 dhparam.pem 文件
openssl dhparam -out dhparam.pem 2048
http2 配置很简单,只要后面增加 http2。
下面 [::]: 表示 ipv6 的配置,不需要可以不加那一行
listen  80;
listen  [::]:80;
listen   443 ssl http2;
listen   [::]:443 ssl http2;
完整NginX配置:
server {
  listen 80;
  listen [::]:80;
  listen 443 ssl http2;
  listen [::]:443 ssl http2;
  server_name example.com www.example.com;

  ssl_certificate ssl/fullchain.cer;
  ssl_certificate_key ssl/example.com.key;

  ssl_session_cache shared:SSL:10m;
  ssl_session_timeout 10m;

  ssl_prefer_server_ciphers on;
  ssl_dhparam ssl/dhparam.pem;
  ssl_protocols TLSv1 TLSv1.1 TLSv1.2;
  ssl_ciphers EECDH+CHACHA20:EECDH+AES128:RSA+AES128:EECDH+AES256:RSA+AES256:EECDH+3DES:RSA+3DES:!MD5;

  add_header Strict-Transport-Security "max-age=31536000; includeSubDomains; preload" always;
  add_header X-Frame-Options DENY;
  add_header X-Content-Type-Options nosniff;
  add_header X-Xss-Protection 1;

  location / {
    proxy_pass http://localhost:5000;
    proxy_http_version 1.1;
    proxy_set_header Upgrade $http_upgrade;
    proxy_set_header Connection keep-alive;
    proxy_set_header Host $host;
    proxy_cache_bypass $http_upgrade;
    proxy_set_header X-Forwarded-For $proxy_add_x_forwarded_for;
    proxy_set_header X-Forwarded-Proto $scheme;
  }
}
重启Nginx
#检查配置文件错误
nginx -t
#重启nginx
nginx -s reload
参考来源:
[1] 在Ubuntu 18.04上使用Nginx部署ASP.NET Core Web应用
[3] 解决 nginx: [error] invalid PID number "" in "/usr/local/nginx/logs/nginx.pid"
[4] 如何在ubuntu上部署Let's Encrypt SSL证书
[5] 免费SSL 证书:Ubuntu18.04和16.04LTS使用Let’s Encrypt给nginx安装ssl
[7] certbot-auto申请https证书,自动续期
This article was last edited at